Pages

Showing posts with label 3d art. Show all posts

Monday, July 29, 2024

Star Wars Project Episode VI: Return of Your Mom

Final Animatic: 


Team Progress:

    With all assets completely done modeling, the team moved onto Polish for the last 2 weeks of the project. During this final sprint, all textures were fully completed, more decals for graffiti and blaster scorch marks were made for set dressing, lighting received a 3rd and 4th pass, and animation was finalized for real this time.

    However, Motion Builder had Different Plans.

    After many many hours of wailing and gnashing of teeth (and about 20 retries on looping the walk cycle of the troopers only to end in bitter defeat), the motion capture data was finally cleaned, skating was minimized, the blaster was constrained to the hand and the secondary hand was constrained to the blaster.

    In Unreal, the Trooper and the DC-15a Blaster Prop was socketed together in a Blueprint and placed in the level. And then put through another round of additive animation.

    Finally, the Sequence was reviewed over and over until my eyes bled and I still somehow missed that the walker stopped in frame and froze for the last half of the animatic. The walker ultimately got a final (Final polish v02 for real this one) pass and everything rendered out nice and neat (after...weeks of not rendering out nice OR neat. At all).

    The animatic ultimately ended up being 17 seconds of cinematic cutscene, 1 march cycle offset on 7 different troopers, an Idle Trooper animation, and the Main Trooper Highlight animation, completed in motion builder, plus the additional animation of the Walker, all done natively in Unreal with a custom made control rig.


Animation Highlights from this Project

Huge Shoutout again to my amazing teammates: 

Jessica Blask ; 3D Character Artist- AT ST Walker

Eric Wiley ; 3D Character Artist - Tank Trooper

Justin Diaz ; 3D Environment Artist

Haley Kroppman ; 3D Prop Artist - DC-15a Rifle Blaster

Kirsten Futch ; 3D Hard Surface Prop Artist

and a huge shoutout to my SFX Designer, Yegues Shettini

Wednesday, July 17, 2024

Star Wars Project Episode V: The Cohort Strikes Back

 Team Progress:

    Work work work- we turned up the juice these two weeks to power through our production phase and get all our assets as finalized as we could.

    From a production standpoint, we were able to hit most of our goals during this fifth sprint, which leaves the team able to use our last two weeks of work to polish our assets to the highest quality we can! We successfully completed the following:

  • All models finalized
  • (Almost) All textures finalized
  • Dirt/Rubble Effects and set dressing
  • Animation pass 2/2
  • Lighting pass 2/3


    We also had a few happy surprises happen during the sprint regarding the characters:

    A collaborative effort between the animation department and the character modeling department (read: me and Eric) led to a Storm Trooper Skeletal Mesh Update. Together, we worked to split the topology of the Trooper between the flexible leather uniform and the hard plastic-like armor, and with the additional polish time, Eric updated the Trooper's topology to be more skinning and animation friendly. This allowed for significant polish to the trooper rig, including the addition of secondary animation on the shoulder pads and belt pouches to reduce clipping and breathe more life into the trooper's motion capture performance.

    Additionally, Jedha now has a new robot friend to keep our Gonk Droid company- our Prop Artist Kirsten was able to create a new BB-8 model along with finishing all of her planned set dressing props.

    Our environment is coming together nicely with a beautiful update to the rubble set dressing and procedural sand/stone textures along the buildings and a second pass at scene lighting.

    And finally, animation is being polished to perform as naturally as possible. Another cool surprise the additional time allowed for was a re-animation of our second camera.

    We went back to the motion capture studio and connected our Star Wars scene to our Vicon Shogun Live set up on stage and used Live Linking to record live animation data for our camera directly into our sequence, reacting as if our point-of-view character was ducking away from the searching stormtrooper.


Animatic Version 5: Unreal Sequence


Still to Come:
  • Placing the blasters in the trooper's hands correctly
  • Final Lighting Pass, including volumetric fog
  • Final Sound, courtesy of Yegues Schettini

Stay tuned for Episode VI...

Wednesday, May 22, 2024

Star Wars Project Episode I: The Fiean Menace

 The Goal: 

Create a 5-10 second in-game cinematic sequence in Unreal Engine 5.3 of a Walker from Star Wars marching down an alley in the outer rim.


Necessary Components for the Team:

Hard Surface Robotic Character Artist (Jessica Blask): To create a high poly and game ready, texutred model of an AT ST Walker (and provide additional set dressing support not covered by environment artist)

Environment Artist with a Hard Surface Preference (Justin Diaz): creates environment for the sequence; establishes and maintains scene scale and lighting

Prop Focused Hard Surface Artists: (Kirsten Futch and Haley Kroppman): create additional environmental loose props to populate set and establish scale

Hard Surface Focused Character Artist: (Eric Wiley): creates human stormtrooper character models; large focus on their uniform armor

Unreal 5.3 Animator (Paige Thorsen): Responsible for camera sequencer creation, animation of AT ST Walker, animation of marching troopers, all done in Unreal Engine

I'm also on point for most of Production Management, including the plan moving forward for a bi-weekly set of 6 Sprints


Why Star Wars:

    Several of our team's target studios make high value Star Wars games, for example: BioWare, Respawn, DICE, and EA. As hopeful entry level industry workers, we're seeking to analyze how a studio tackles a 3D interpretation of a large IP.


Episode 1: Schedule and References:

https://docs.google.com/spreadsheets/d/12V1pU1FQZHtQVUSFJ7CoHtqxB9tiQHxMiPlqFY-p890/edit#gid=0

    To plan the project and the necessary teammates required plus their spheres of influence, a Gantt Chart was created alongside the initial project pitch, which was then revised to accommodate portfolio worthy assignments for each team member along with their necessary spheres of influence. If you like looking at nice colorful spread sheets, take a look at the link above.


From there, the team moved into the Concept and Reference research:


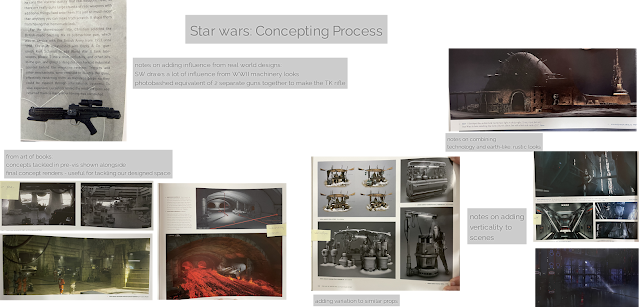
The team collectively did research into the LucasFilm concepting team's process and how they achieve the Star Wars "Look" and how we can achieve similar styles.


From the "Art of Rogue One, Mandalorian, and the Force Awakens" books, the team selected an environment based on the marketplace/cantina in Jedha, a dusty outer rim planet.


From concept art, movie stills, and comic books, items were selected to act as inspiration for prop research and reference around the scene.


Loose Prop assets are being tracked in an Asset List: what doesn't get completed by the available prop artists will be sourced from asset packs to fill the scene and make it feel lived in, but the schedule allows for about 1-2 hero assets per prop artist and 5-6 background assets per prop artist, for a maximum total of 18 original props.


Animation references were pulled from scenes of troopers marching in Andor, Rogue One, and Disney Hollywood Studios

**Student actors were motion captured with walking cycles during a mo-cap workshop, video not shown here to protect actor privacy until they give consent to share video**


During the environmental research, the animator went through a rough proxy storyboard pass of a layout and sequence of action for our actors to go through:


2 storyboard layouts from the 2D Proxy Sequence


5 second animatic with one camera movement


10 second animatic with 2 camera shots


10 second animatic, slightly edited with suggestions from team and animation mentors


The animatic was then timed out in a test 3D proxy layout scene in Unreal


All proxy assets on display in engine


All proxy assets on display in engine, with preliminary environment and set dressing


Stay tuned for Episode II: Attack of the Cameras

Friday, January 12, 2024

Lighting Workshop: 3 Point Lighting


        3 Point Lighting Set Up Created in Unreal Engine as part of a lighting exercise. The Lights were created first in White Light only, then separated by color assignments: Red for Key Light, Green for Fill Light, and Blue for Rim Light. 


3 Point Lighting Set Up for Le Transi De Rene De Chalon
Model provided by threedscans


    A separate 3 Point Lighting set up was created for the second model, which was lit with the same method as the first; a key, fill, and rim light in white and then in color. Again, Red for Key Light, Green for Fill, and Blue for Rim Light.


3 Point Light Set up for Glykon
Model provided by threedscans


Sunday, October 8, 2023

Star Wars Crate Project Part 3: Importing Maps to UE5


Texture Maps painted in Substance Painter, Images rendered in Unreal Engine 5


Reference Images from the animated series Star Wars Rebels


Monday, October 2, 2023

Star Wars Crate Project Part 2: High Poly Mesh and Substance Baking

High Poly Sculpt of Crate in ZBrush


Low Poly Re-mesh from ZBrush


First Pass at Texturing in Substance Painter, with high poly mesh baked onto low poly mesh and a base procedural grunge metal applied. Rendered in Substance Painter.


Crate Texture References:


Thursday, September 28, 2023

Common Art 5: Perspective Excersise


 The theme of this perspective exercise was "transport", so to keep with the other progressions of the common art exercises I designed a custom Mario Kart Wii Mach Bike for Samus so she can race with the other Nintendo characters.

I used a proxy 3D model to set up an accurate two point perspective in Maya with grids, and set up a camera with the focal length i wanted for both my composition and my perspective reference.


The Mach Bike was modeled after the 1972 Harley Davidson XRTT Road Racer, originally created to keep up with British racing motorcycles.

References


Monday, September 25, 2023

3D Art Week 05: Simple Crate and Barrel Proxy, Low Res, and Hih


Crate inspired by Imperial Crates on Star Wars: the Clone Wars, Star Wars Rebels, and Bad Batch animated series


Maya Viewport: UVs and wireframe


Unreal engine: In-engine viewport with primitive lighting build


Reference Images, from the Star Wars animated series


Tuesday, September 19, 2023

Tech Art: Lighting Demo


Responsible for: Environment and Room Lighting
Assets From: Unreal Alchemist's House Asset Pack


First time Lighting in Unreal Engine 5


Monday, September 18, 2023

Friday, September 8, 2023

3D Art Homework 03: Head Sculpt

3D Art: Zbrush Head Sculpt


The goal of this project was to familiarize myself with Zbrush's interface and tools to sculpt a head and neck. In the spirit of spooky season, I decided to sculpt Victor van Dort from Tim Burton's "The Corpse Bride".
Image for reference:


Hair and Clothes to come in the near future, maybe even some preliminary textures. Pretty proud of this success since the last head i sculpted turned out kind of...


yeah.


Monday, September 4, 2023

3D Art Homework 2: Minecraft Level

This assignment's goal was to understand how to create and adjust material instances in UE5 and use instanced materials to create a minecraft-like level. Since UE5 has a node based material editing platform, it was surprisingly intuitive for me to get used to.


Featured Post

Artist Roadmap: August 2023